Shopify Inventory Import: Set Stock Levels for Multiple Locations
Shopify Inventory Import: Set Stock Levels for Multiple Locations
When a supplier sends a stock file, it typically contains one quantity column per product variant: the total stock on hand. When Shopify stores inventory, it stores a quantity per variant per location: your warehouse in Sydney holds 45 units, your Melbourne 3PL holds 18, your Brisbane distribution centre holds 62. The same SKU has three inventory records, not one.
The gap between how suppliers report stock and how Shopify stores it is the practical challenge of importing inventory data for multi-location merchants. A single-column stock quantity maps straightforwardly to a single-location store. For stores with two, three, or more active fulfilment locations, the import has to either distribute the supplier total across locations or map separate location-specific columns if the supplier provides them.
Getting this right at import time prevents a common post-import problem: all stock landing at the default location while other locations show zero, requiring manual inventory adjustments across every variant before orders can be fulfilled from the correct location.
How Shopify Multi-Location Inventory Works
Shopify allows inventory to be tracked separately at each fulfilment location. A merchant with three locations has three inventory records for every variant: one per location. The total available quantity in Shopify is the sum across all locations. When an order arrives, Shopify's order routing determines which location fulfils it based on the merchant's routing rules.
The practical consequence for imports is that setting inventory requires specifying not just the quantity but the location. In Shopify's product CSV format, inventory quantity is set with a location-specific column. The column name format includes the location name: Variant Inventory Qty maps to the default location; additional columns in the format Location [Location Name] Qty map to named locations.
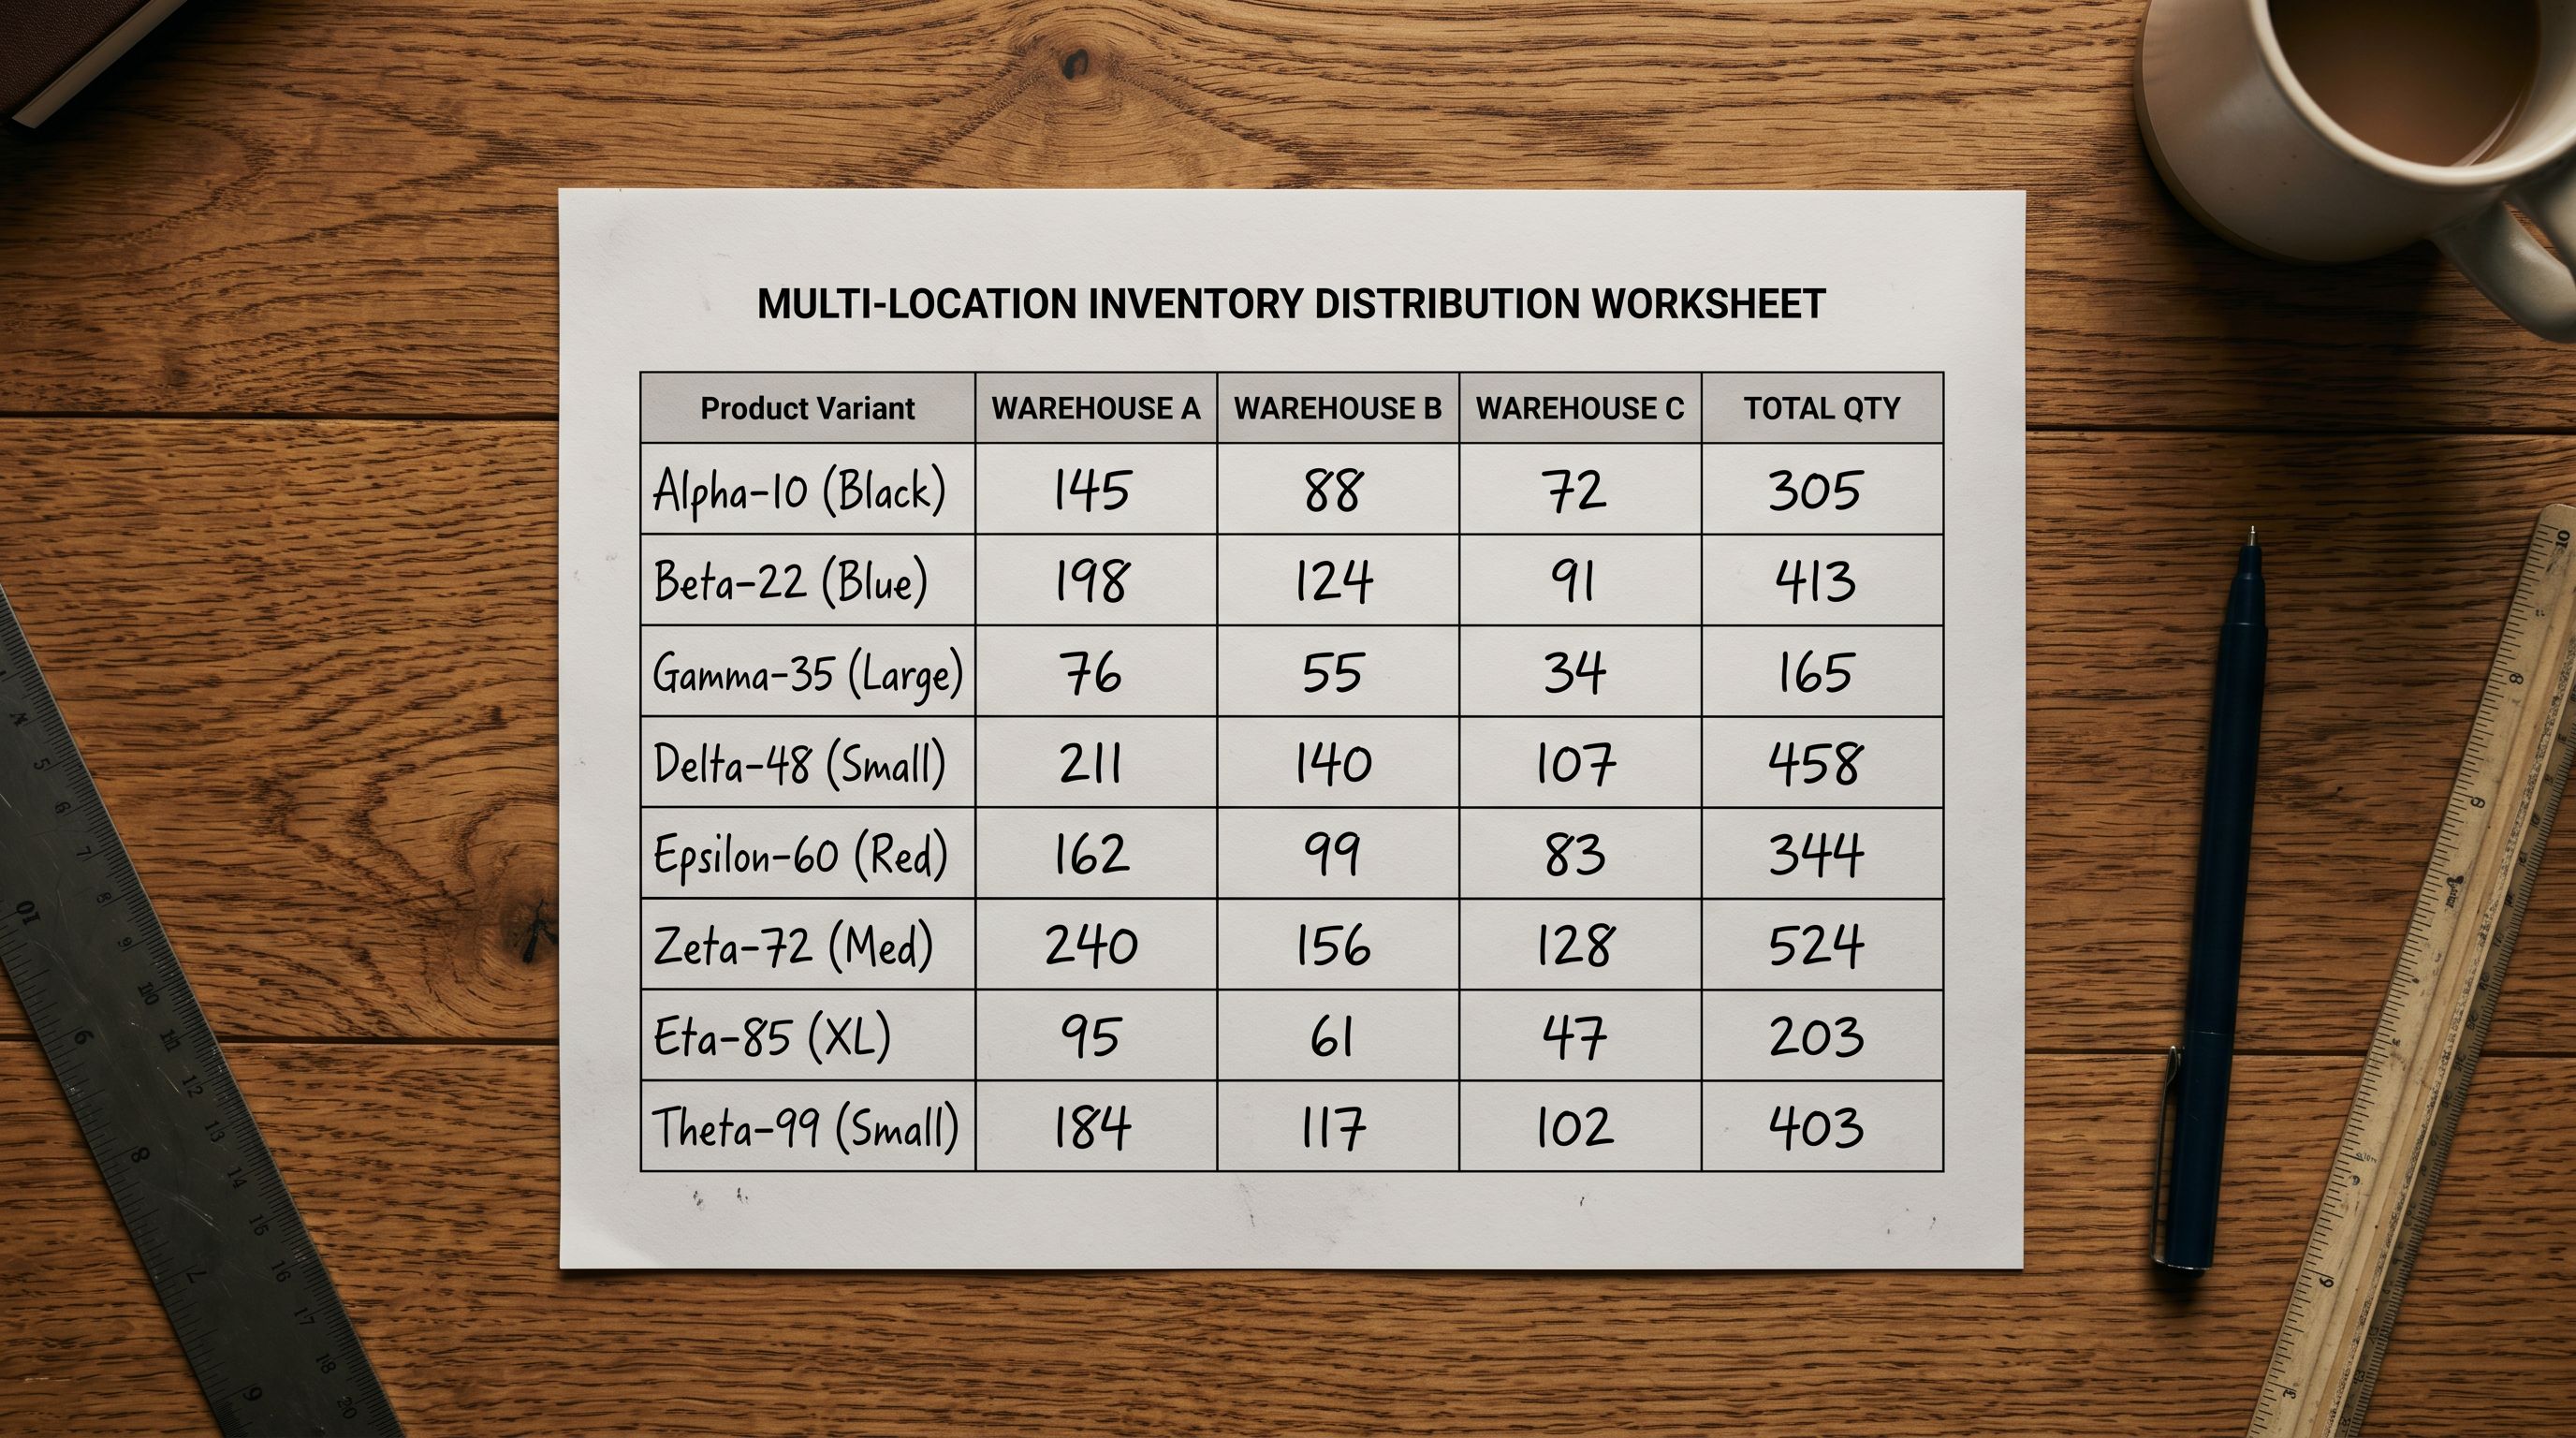
For a merchant with three locations named "Sydney Warehouse", "Melbourne 3PL", and "Brisbane DC", the inventory columns in a multi-location import are:
Location [Sydney Warehouse] QtyLocation [Melbourne 3PL] QtyLocation [Brisbane DC] Qty
Each column takes an integer value for each variant row. A variant with 45 units in Sydney, 18 in Melbourne, and 62 in Brisbane has values 45, 18, 62 in the respective columns. The total available in Shopify is 125.
When Your Supplier File Has One Quantity Column
Most supplier stock files provide a single quantity per SKU. This is the supplier's total on-hand figure across all their warehouse locations. The import has to decide what to do with that total.
Three approaches apply depending on the merchant's fulfilment model:
Assign all stock to one location. Map the supplier's total quantity to a single Shopify location column. This is correct when all imported products will be fulfilled from one location regardless of where else you have inventory capacity. A merchant who uses a single 3PL for all fulfilment maps the supplier total to that 3PL's location column and leaves other location columns at zero.
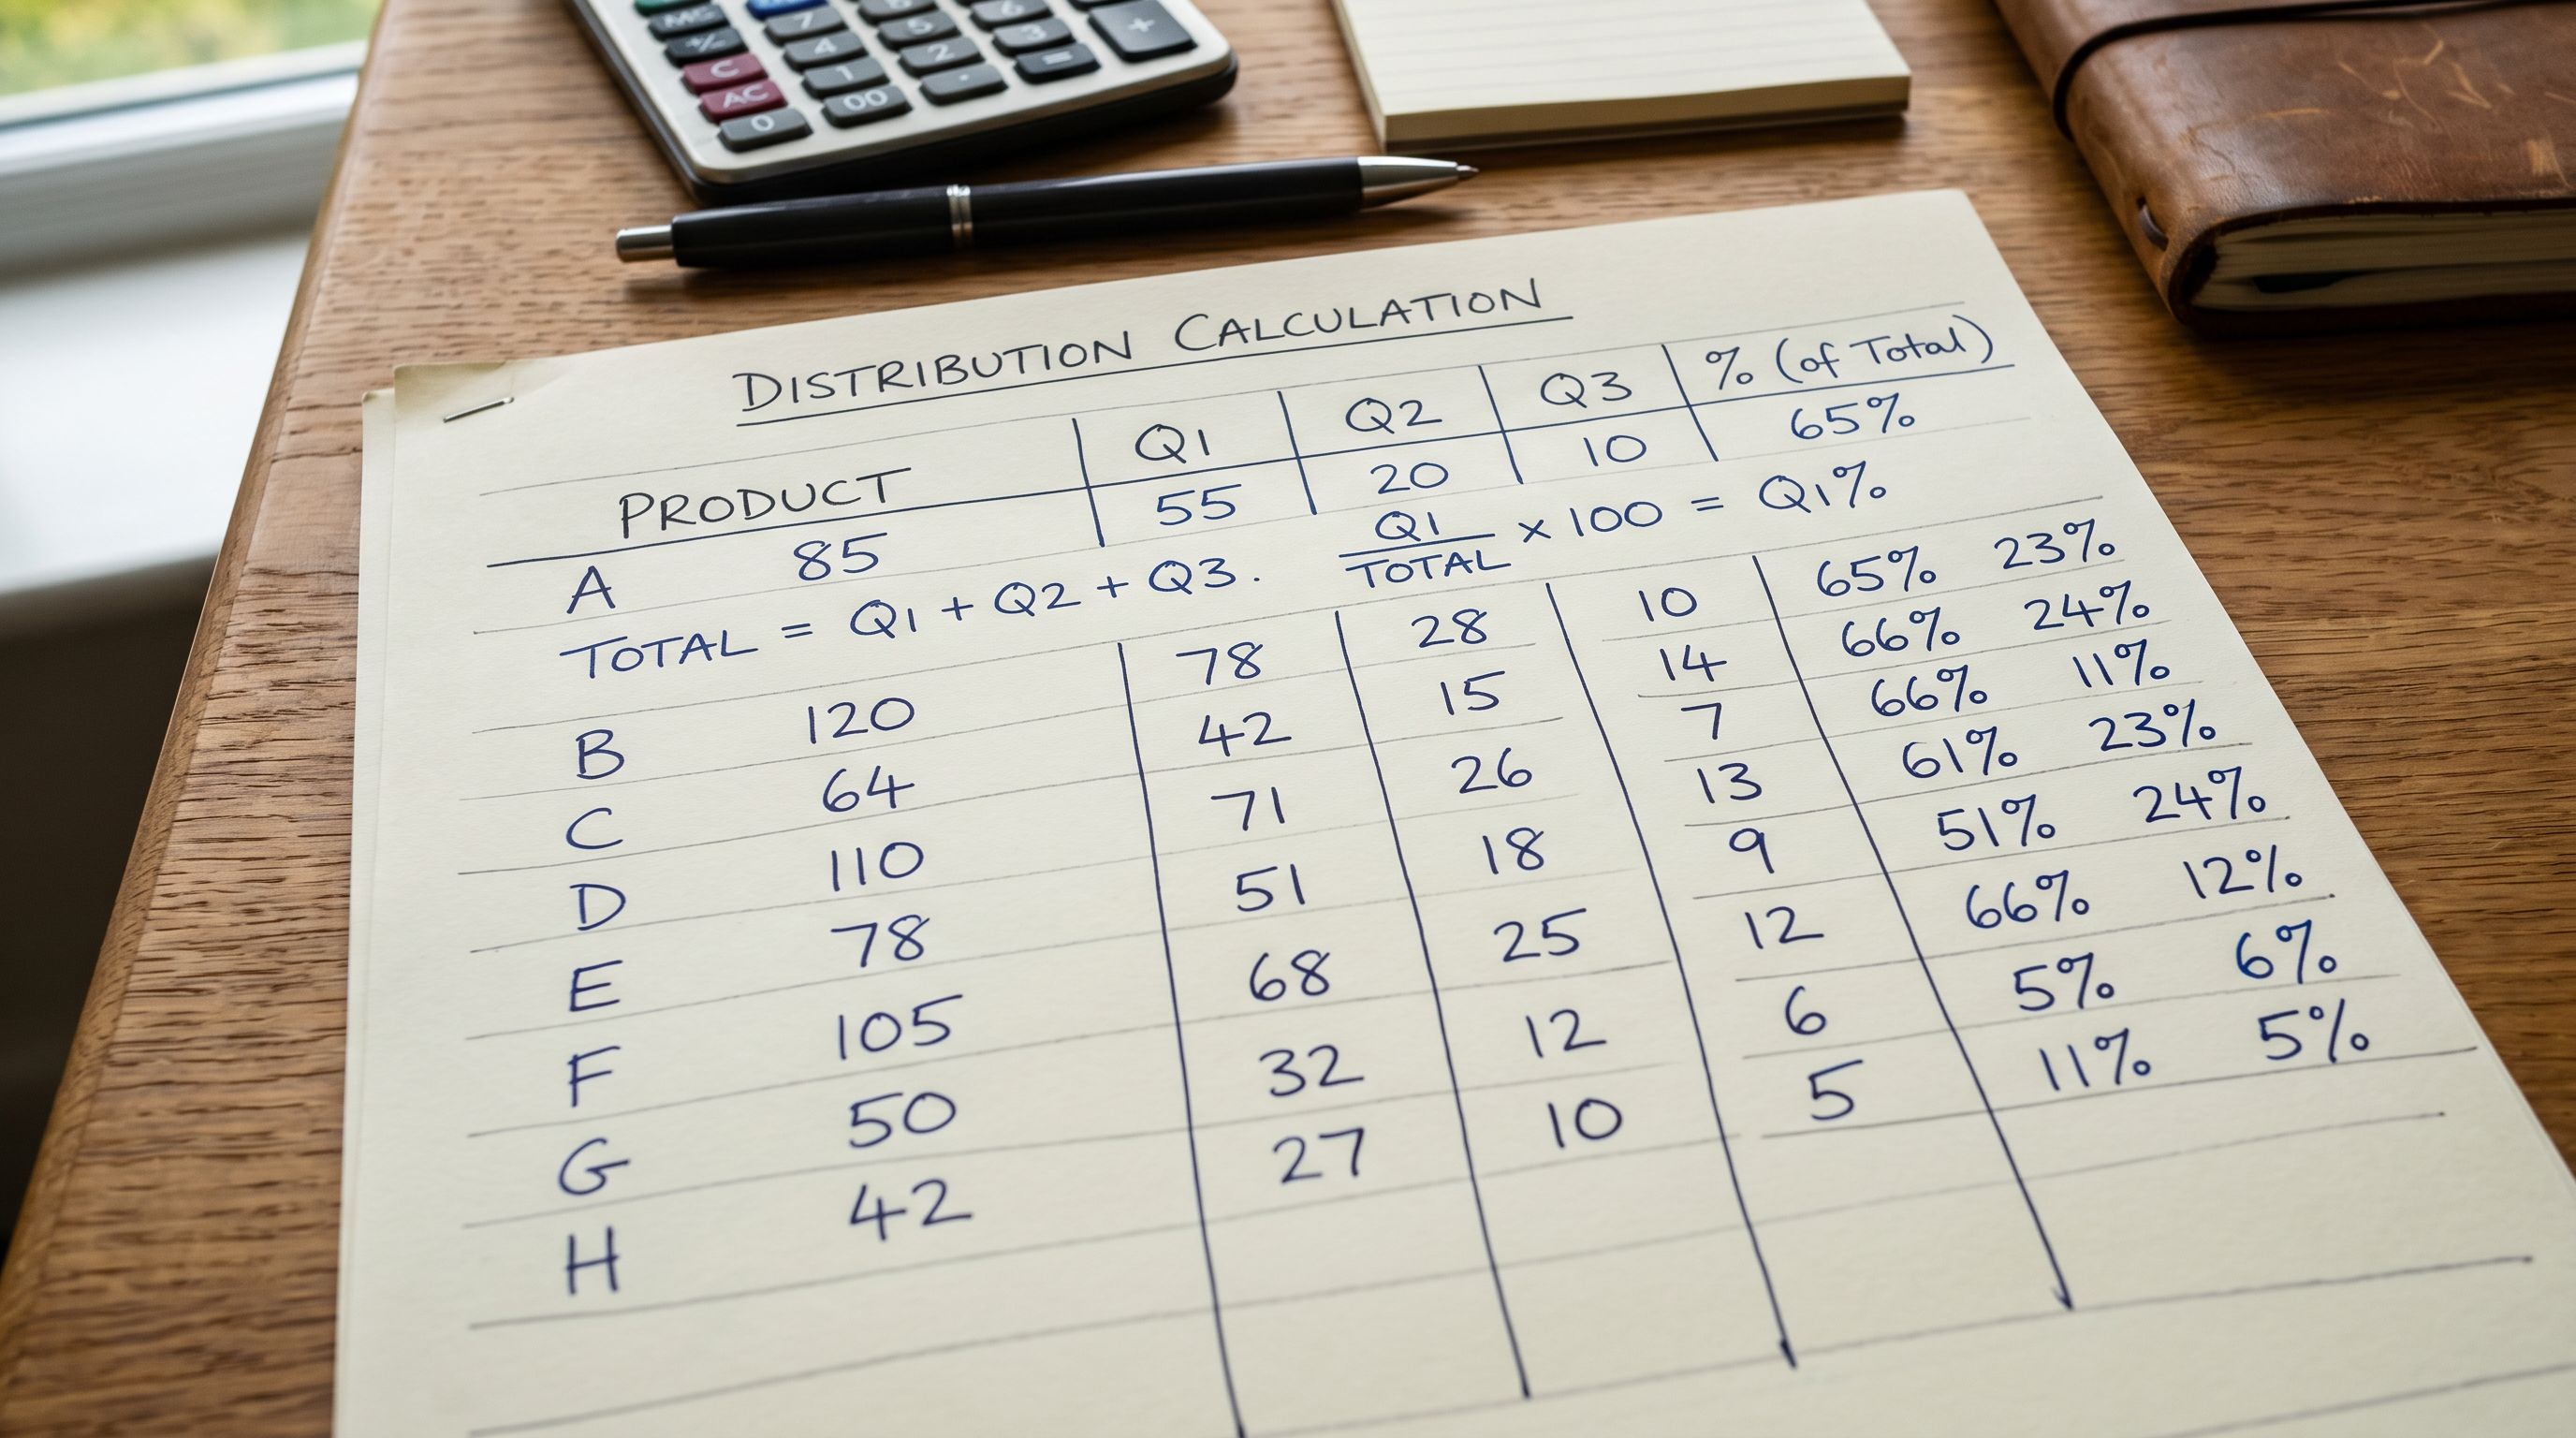
Distribute by fixed ratio. Apply a calculated split to the supplier's total quantity across multiple location columns. A merchant who distributes roughly 50% to their primary warehouse and 25% each to two secondary locations applies multiplication to each row in the source file before import. For a variant with a supplier quantity of 100, the three location columns receive 50, 25, and 25. This can be calculated in a spreadsheet before upload using standard column formulas.
Import to default, redistribute after. For merchants whose distribution model depends on current demand signals (sales velocity per location, current stock levels, pending orders), a two-step approach works: import the total quantity to the default location, then use Shopify's inventory adjustment tools to redistribute once the products are live and the current demand picture is visible.
- 01Identify your fulfilment model. If all orders ship from one location, map the supplier quantity to that location's column only. If you distribute across locations by a fixed ratio, calculate the per-location quantities in the source spreadsheet before upload. If distribution depends on live demand data, plan to import to the default location and redistribute after.
- 02Check your Shopify location names exactly. The column header format is 'Location [Location Name] Qty' where Location Name must match your Shopify location name character-for-character, including spaces and capitalisation. Find the exact names in Shopify admin under Settings > Locations.
- 03Prepare the inventory columns in your source file. Add a column for each location that will receive stock. Calculate the quantity for each variant row. For a fixed ratio split, use a spreadsheet formulaif total quantity is in column D and you want 50% to Sydney, the Sydney column formula is =INT(D2*0.5).
- 04Upload to Importier and open the column mapping step. Map each location quantity column to the corresponding Shopify location field. Importier lists available location fields derived from your connected Shopify store's location list.
- 05In the import preview, verify that the inventory columns show the expected quantities. A variant with 100 total units split 50/25/25 across three locations should show 50, 25, 25 in the three location columns in the preview.
- 06Confirm the import. After the import completes, check a sample of products in Shopify admin under Products > Inventory and verify that quantities appear at the correct locations. A zero quantity at an expected location indicates a column mapping issue that can be corrected with a selective reimport of the inventory columns only.
When Your Supplier File Has Multiple Quantity Columns
Some suppliers, particularly wholesale distributors and 3PLs who manage your inventory, provide stock files with separate quantity columns per their own warehouse. A supplier with distribution centres in Sydney and Melbourne might provide columns labelled "Sydney Stock" and "Melbourne Stock".
In this case, the mapping is straightforward: map the "Sydney Stock" column to the Shopify Location [Sydney Warehouse] Qty field and "Melbourne Stock" to Location [Melbourne 3PL] Qty. The per-location quantities from the supplier file populate directly to the corresponding Shopify location records.
The complication arises when the supplier's location names do not match the merchant's Shopify location names. A supplier's "Sydney Distribution" does not automatically map to a Shopify location named "Sydney Warehouse"; the column mapping step requires the explicit connection. In Importier's column mapping interface, each supplier column is matched to the Shopify location field it corresponds to, regardless of whether the names match.
- All 125 units land at default location
- Melbourne 3PL and Brisbane DC show zero stock
- Orders routed to non-default locations fail to fulfil from available stock
- Manual inventory adjustments required across every variant after import
- Total stock visible in Shopify but not distributed for order routing
- 45 units at Sydney Warehouse, 18 at Melbourne 3PL, 62 at Brisbane DC
- Each location has correct available quantity from day one
- Order routing operates correctly across all locations immediately
- No manual adjustment step after import
- Import History records the per-location quantity mapping for audit
Inventory Tracking Settings at Import
Shopify tracks inventory per variant only when the variant's inventory tracking is enabled. Variants with tracking disabled can be sold without any quantity check. Setting inventory tracking behaviour at import is part of the same import configuration as the quantity columns.
The relevant Shopify CSV field is Variant Inventory Policy. Two values apply:
deny: Shopify prevents orders when the available quantity reaches zero. This is the standard tracked inventory setting.continue: Shopify allows orders regardless of available quantity. Use this for made-to-order products, pre-orders, or products where overselling is acceptable.
A third consideration applies to variants with tracking enabled: whether to set Variant Inventory Management to shopify (tracked by Shopify) or leave it blank (untracked). Products imported without this field set may appear with untracked inventory in Shopify, bypassing the quantity check entirely even when the policy is set to deny.
In Importier's column mapping step, both Variant Inventory Policy and Variant Inventory Management fields are mappable. For a standard tracked inventory import, both fields should be included: Variant Inventory Management maps to shopify as a batch-level default, and Variant Inventory Policy maps to deny unless specific products in the batch require continue.
Setting inventory tracking at import is a one-step configuration. Fixing incorrectly tracked variants after they are live requires finding every affected variant and updating the settings individually, which is significant manual work across a large catalogue.
Audit and Correction
Using Import History for Inventory Audits
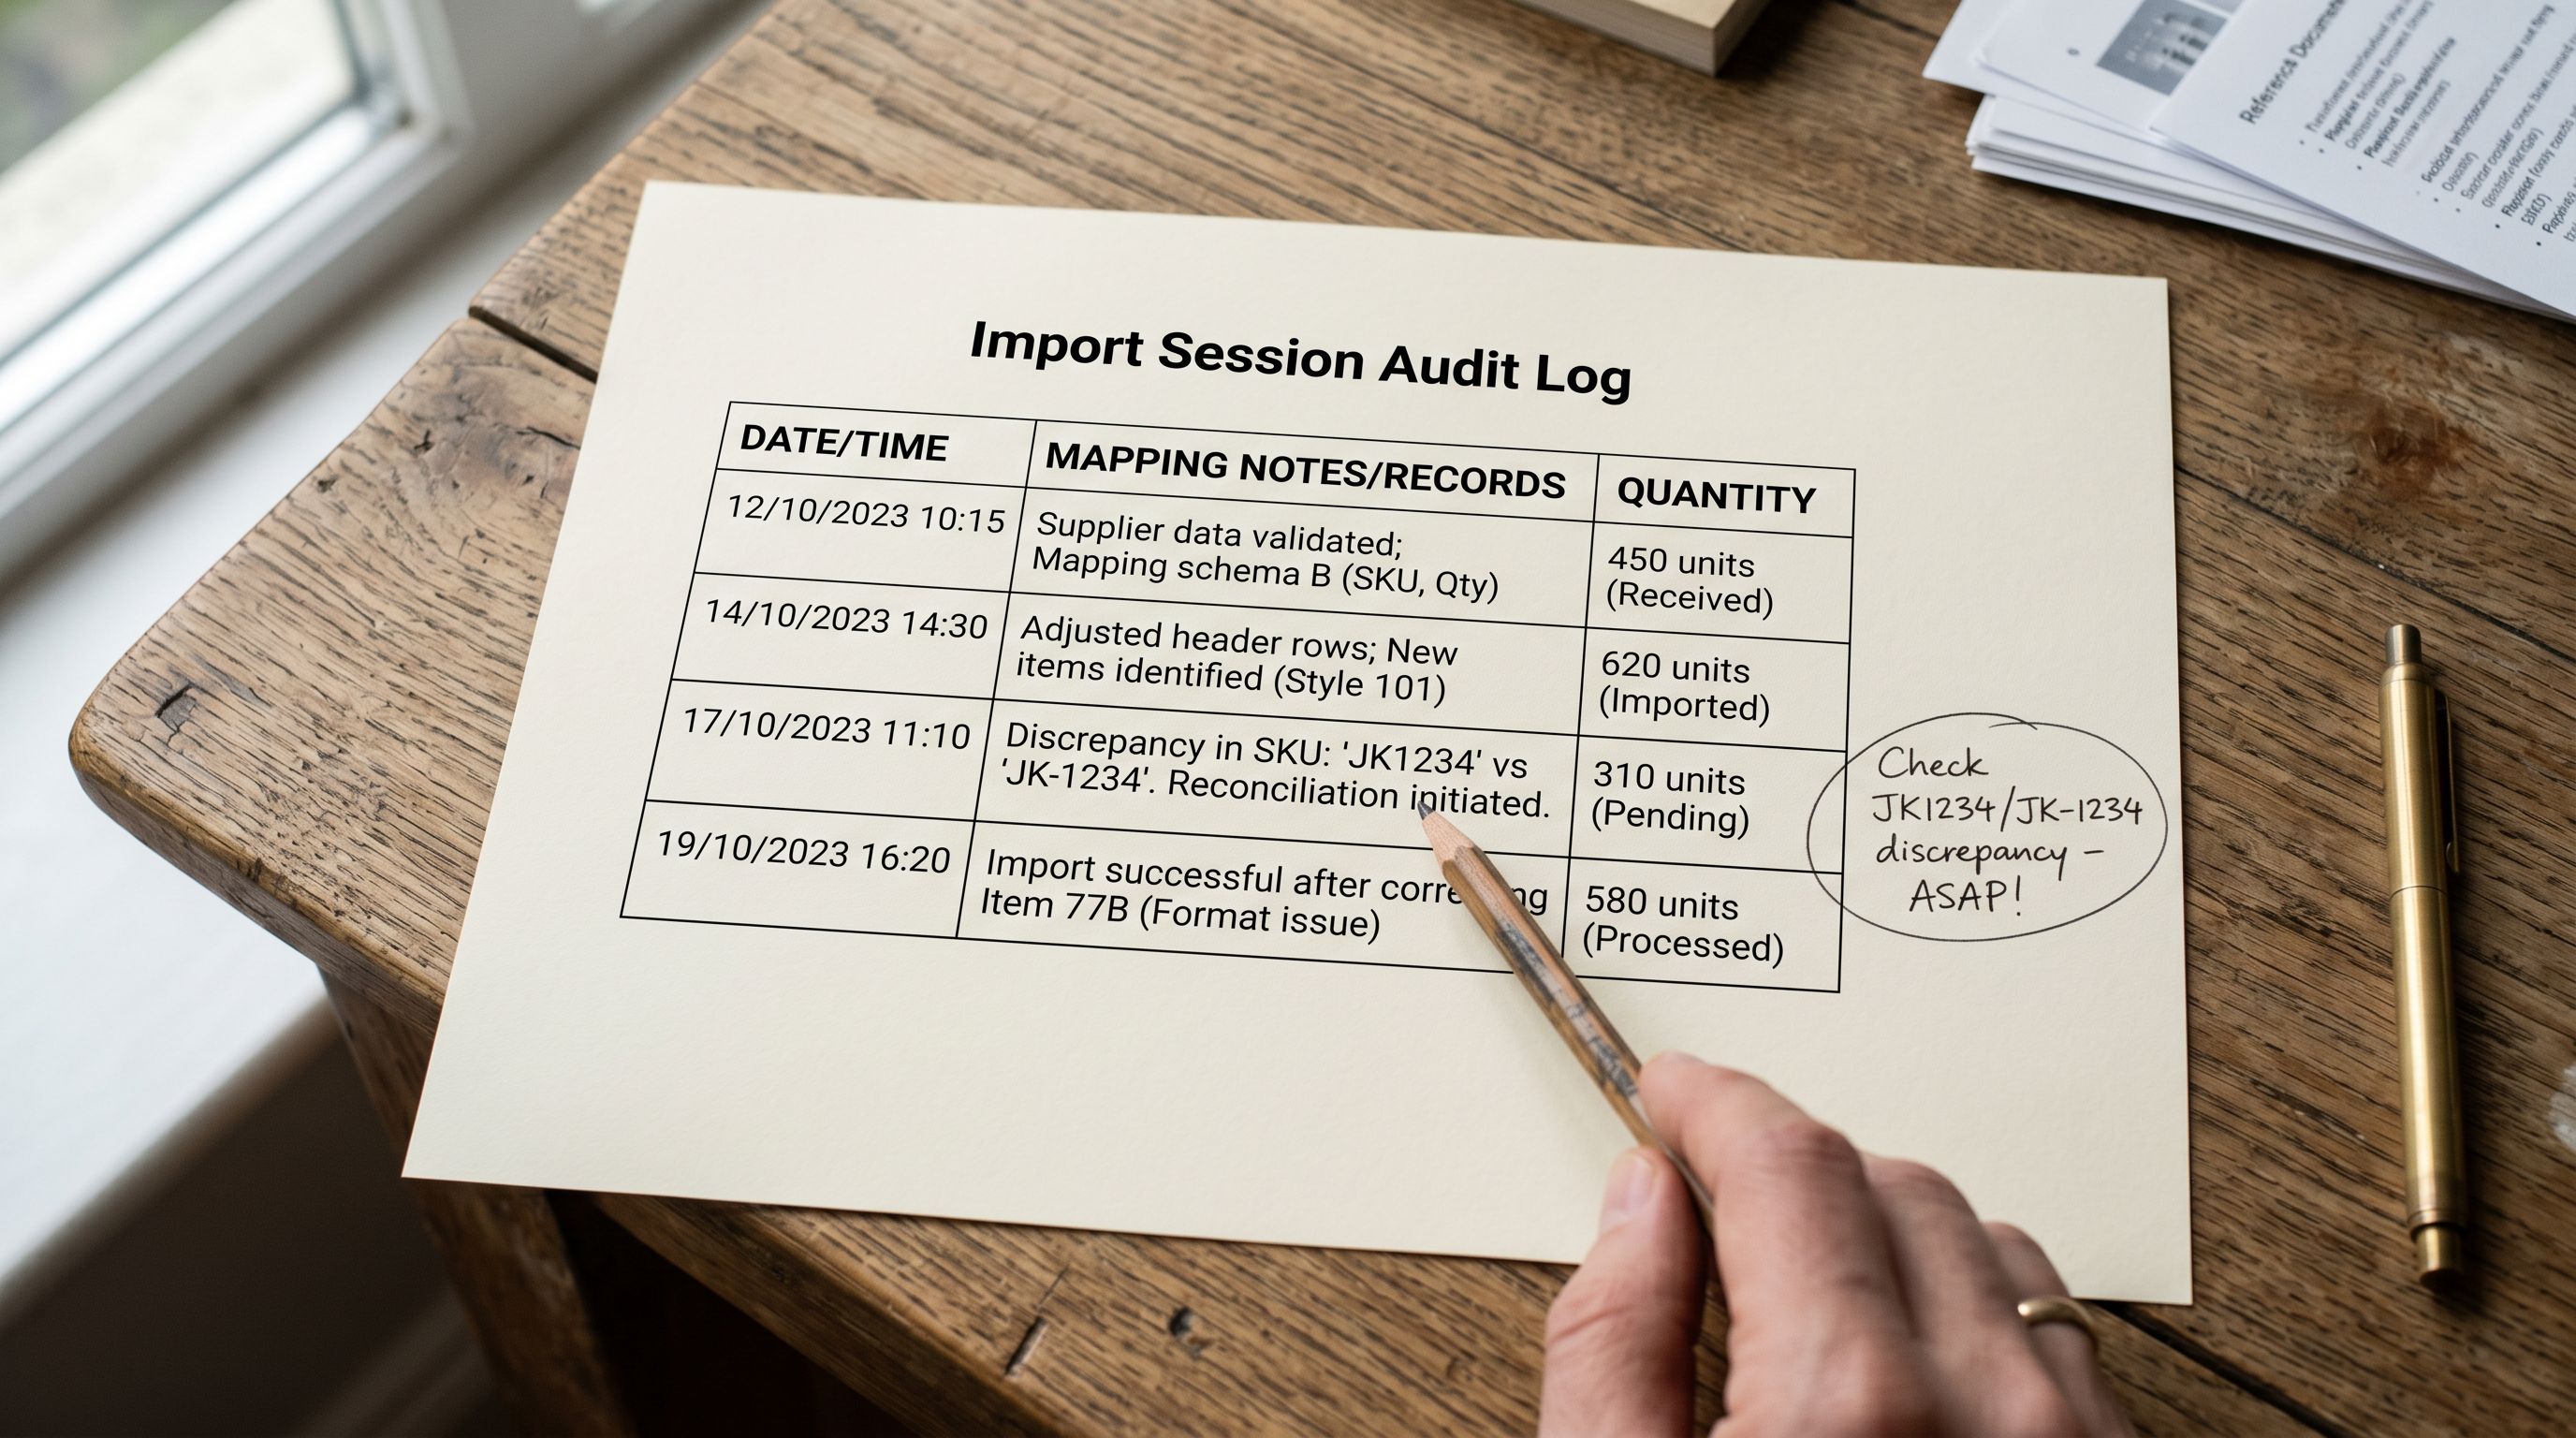
Every import session in Importier creates an Import History record. For inventory imports, this record shows the quantity values that were set per location per variant. If a stock discrepancy is discovered after an import (a location shows lower quantity than expected, or variants appear untracked when they should be tracked), Import History identifies which session introduced the discrepancy and what values were applied.
For merchants who receive regular stock updates from suppliers (weekly or monthly stock files with updated quantities), the Import History provides a session-level audit trail: which import set which quantities, when, and which location columns were mapped. Discrepancies between the expected stock level and the recorded import quantity point either to a data issue in the supplier file or to a mapping error in the import session.
The selective reimport workflow applies here as well. A stock correction after discovering an inventory error does not require reimporting all product data. A narrow file with Handle, Variant SKU, and the relevant location quantity column corrects only the inventory fields, leaving descriptions, pricing, images, and other product data untouched.
For the full walkthrough of selective reimport for corrections, the safe Shopify import guide covers how to use Import History to identify the session to correct and how to scope the reimport to only the affected fields.
For merchants on Shopify Plus managing inventory across a larger number of locations or higher SKU counts, the Shopify Plus product import guide covers the additional import considerations that apply at Plus scale, including inventory management across enterprise fulfilment networks.

Inventory Counts Before and After Import
For merchants importing products into a store that already has active inventory, the import quantity values overwrite the current Shopify quantity for the mapped fields. An existing variant with 30 units in Sydney that is reimported with a supplier file showing 45 units in Sydney will show 45 units after the import, not 75.
This is the expected behaviour for a stock update import: the supplier's current figure replaces the Shopify figure. It becomes a problem when the intent was to add the supplier quantity to the existing Shopify quantity rather than replace it: a scenario that arises when partial shipments arrive across multiple import sessions and the merchant wants to accumulate totals rather than overwrite.
For this scenario, the source file should be prepared to show the correct final quantity rather than the quantity of the incoming shipment. If Shopify currently shows 30 units in Sydney and 45 are arriving, the import file should contain 75 (the intended total after receipt), not 45 (the quantity of the incoming shipment alone).
Shopify's multi-location inventory documentation covers how Shopify's inventory model works across locations, including how available, committed, and on-hand quantities are calculated and what triggers inventory adjustments in the platform. Shopify's product CSV reference documents the exact column name format for location-specific inventory fields and the accepted values for inventory policy and management fields.
For the complete CSV import workflow including the column mapping step and preview verification, the Shopify CSV import guide covers every stage from file upload through to products live in Shopify.
Correct Inventory From the Import, Not After
Multi-location inventory errors discovered after an import are correctable, but the correction requires identifying every affected variant, calculating the correct quantity per location, and either making manual adjustments in Shopify admin or running a selective reimport. For a 500-SKU catalogue across three locations, that is a significant amount of work.
The column mapping step in Importier is the moment to set location-specific quantities correctly. The five-row preview confirms the values before any data reaches Shopify. Verifying three rows of inventory quantities in the preview takes under a minute. Fixing 500 variants after the fact takes considerably longer.
Try Importier free at importier.app
Set up your first import in under five minutes.
Importier brings products into Shopify with AI descriptions, category metafields, and data enrichment on every run.