Shopify Custom Pricing: Markup, Markets, and Wholesale
Shopify Custom Pricing at Import: Markup, Markets, and Wholesale
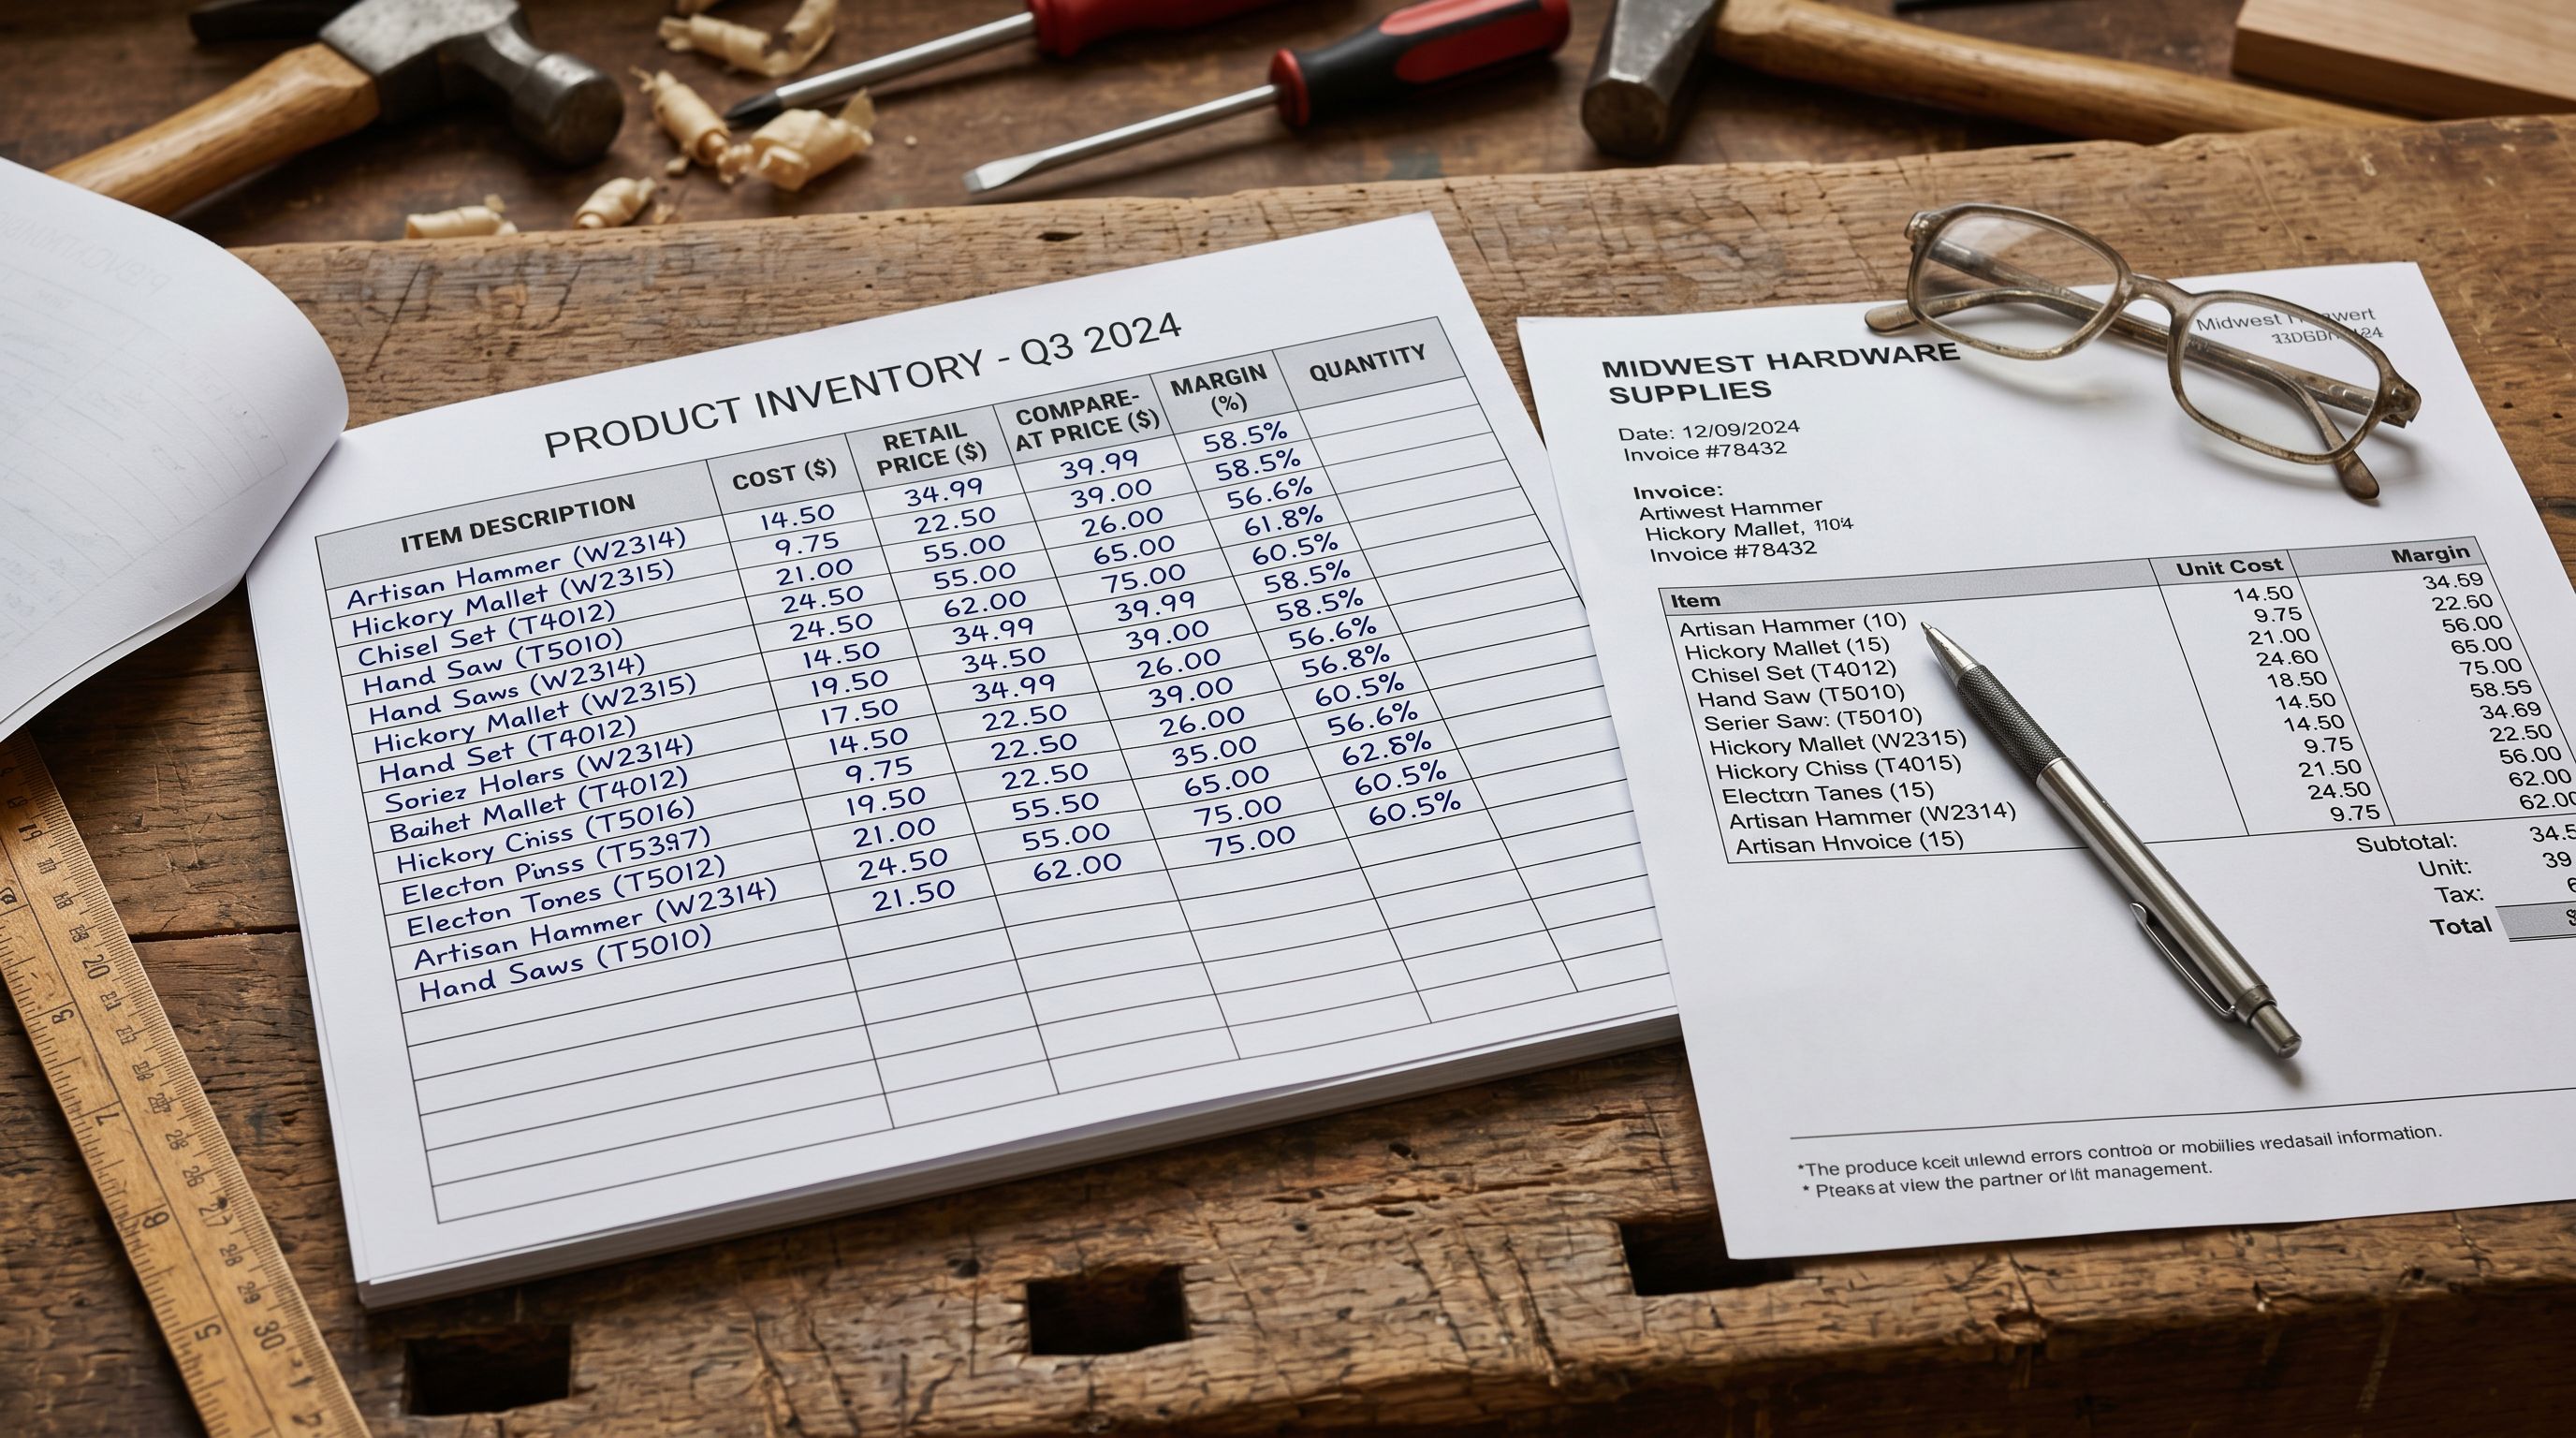
Supplier files come with cost prices, not retail prices. A supplier sends you a CSV with a "Cost" column showing what you paid for each product. Your Shopify store needs a retail price, a compare-at price if the item is on sale, and potentially a wholesale price for B2B buyers. None of those are in the supplier file unless you calculate them.
The standard workaround is to open the CSV in a spreadsheet, add a column with a formula (cost × 2.5 for a 150% markup), and fill it down. Then import the modified file. When the supplier updates prices and sends a new CSV next month, you repeat the process.
Importier's column mapping applies these price calculations at import time, without modifying the source file. The supplier CSV stays untouched. The markup formula, the compare-at logic, and the B2B price column all get configured once in the mapping profile, then run automatically on every subsequent import from that supplier.
The Three Pricing Columns That Matter at Import
Shopify products have four price-related fields that are relevant at import. Understanding what each does makes the mapping logic clear.
Price: the customer-facing retail price. This is what appears on the product page and in collections. It is also what Google Shopping, AI Shopping agents, and comparison engines use when evaluating the product.
Compare-at price: the original or full price shown alongside the current price. When compare-at is higher than price, Shopify displays the sale badge and shows the original price with a strikethrough. Google Merchant Centre uses this to classify items as "on sale" for its Shopping filters.
Cost per item: what you paid for the product. This is used for margin calculation in Shopify analytics. It does not appear to customers.
Wholesale/B2B price: the price shown to B2B buyers under a specific price list. In Shopify's B2B features (available on the Plus plan), price lists override the standard retail price for company accounts. This is a separate mapping from the retail price column.
The practical import question is: which column in your supplier file maps to which Shopify field, and what calculations need to run before the value lands in Shopify?
Scenario 1: Fixed Markup Multiplier
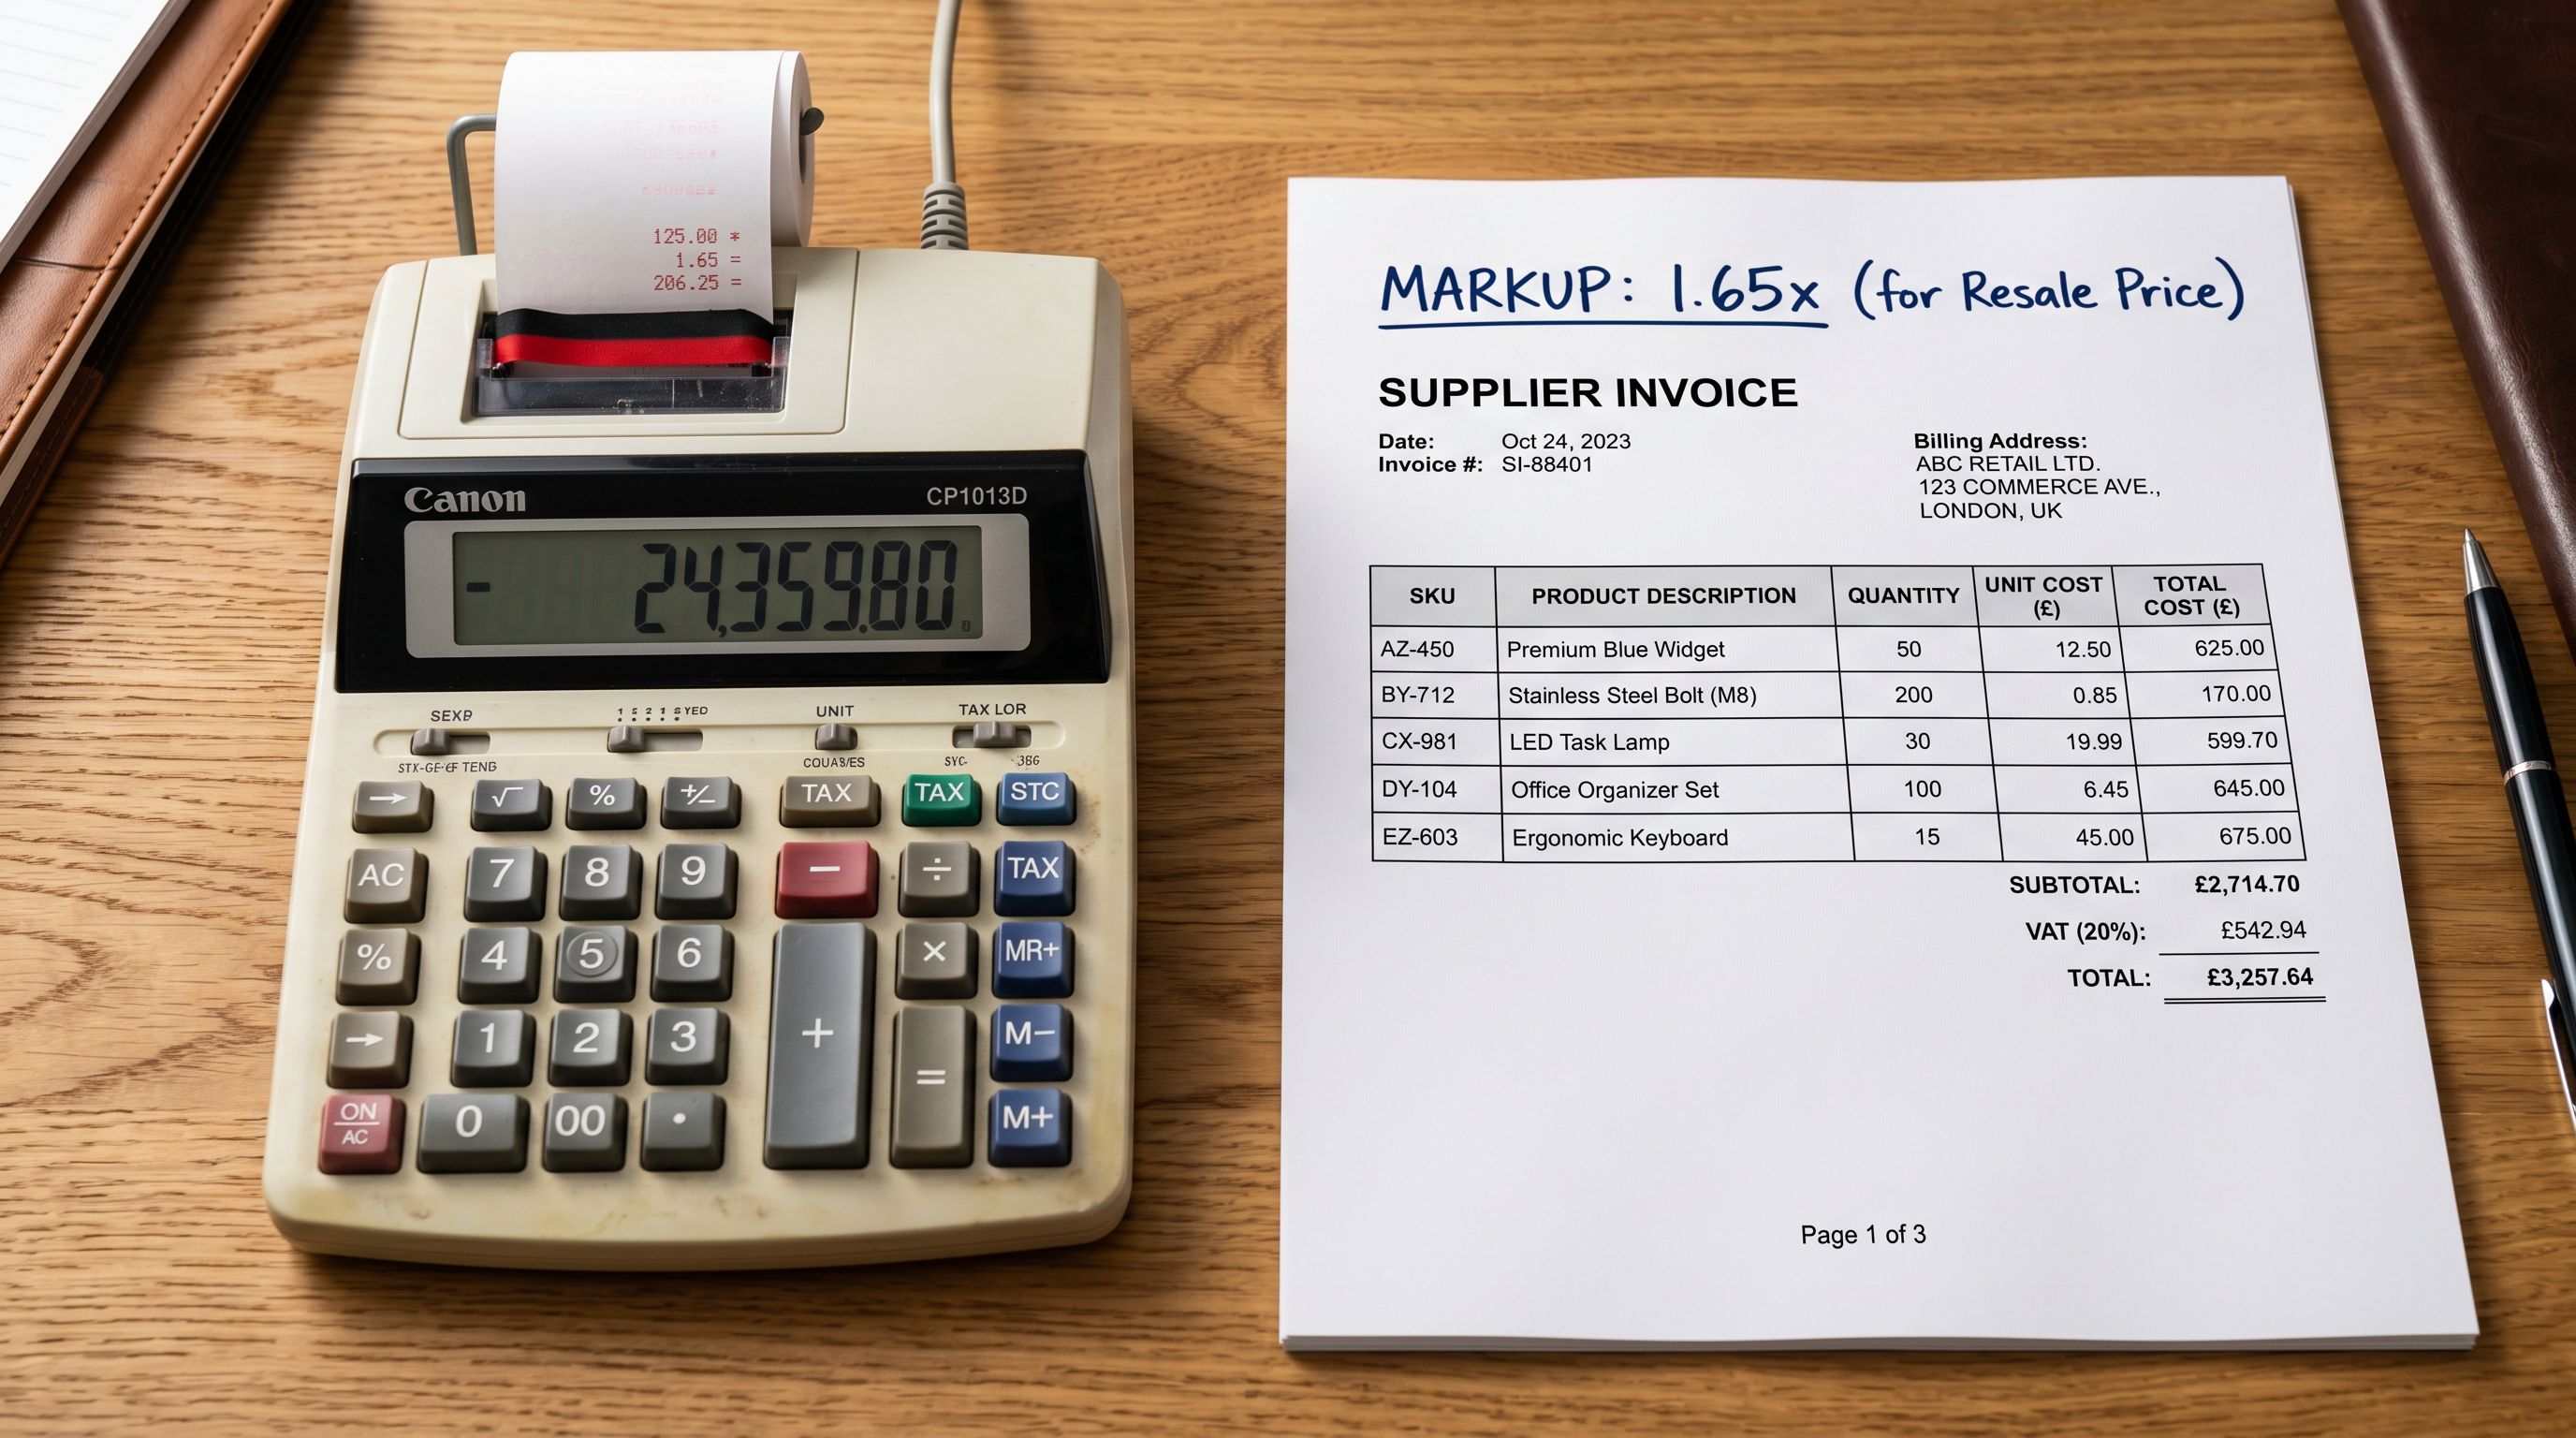
The most common pricing scenario is a fixed markup multiplier: retail price is cost multiplied by a factor, and the compare-at price is optionally set to the standard retail price when the item is on promotion.
The column mapping for this scenario:
- Map cost column to Shopify Cost per item: tells Shopify what you paid.
- Apply markup multiplier to price field: Importier's calculated field applies the formula (e.g., cost × 2.2 for a 120% markup) to produce the retail price.
- Set compare-at price: either map a separate "RRP" column from the supplier file if one exists, or set compare-at to a higher multiplier (e.g., cost × 2.8) so the displayed retail price appears discounted against the full market price.
A wholesale accessories merchant importing from a supplier file with columns for SKU, product name, cost (AUD), and category used this workflow to produce retail prices at a 2.5x multiplier and compare-at prices at 3.0x. At import, 300 products arrived in Shopify with correctly calculated prices and compare-at values, with the sale badge appearing on products where the retail price was below the compare-at price.
The Shopify compare-at price guide covers how compare-at prices work in Shopify's storefront and feed, including the conditions under which Shopify displays the sale badge and how Google Shopping uses compare-at data for its "on sale" filter.
The markup formula runs once, in the mapping profile. Every import from that supplier applies it automatically, even when the supplier updates costs next month.
Scenario 2: Shopify Markets and Regional Pricing
Shopify Markets lets merchants sell in multiple countries with different prices in different currencies. The base price is set in your store currency; Shopify uses exchange rates and optional price overrides to display localised prices in each market.
For import-driven stores, the relevant question is: can you import market-specific prices from a supplier file? The answer depends on how your supplier provides the data.
If your supplier provides regional prices as separate columns (e.g., "Price AU", "Price US", "Price UK" in the same row): Importier maps the correct column to the Shopify base price for the import session. For a store primarily selling in Australia, map "Price AU" as the retail price. Shopify Markets then handles the conversion to other markets based on your exchange rate settings.
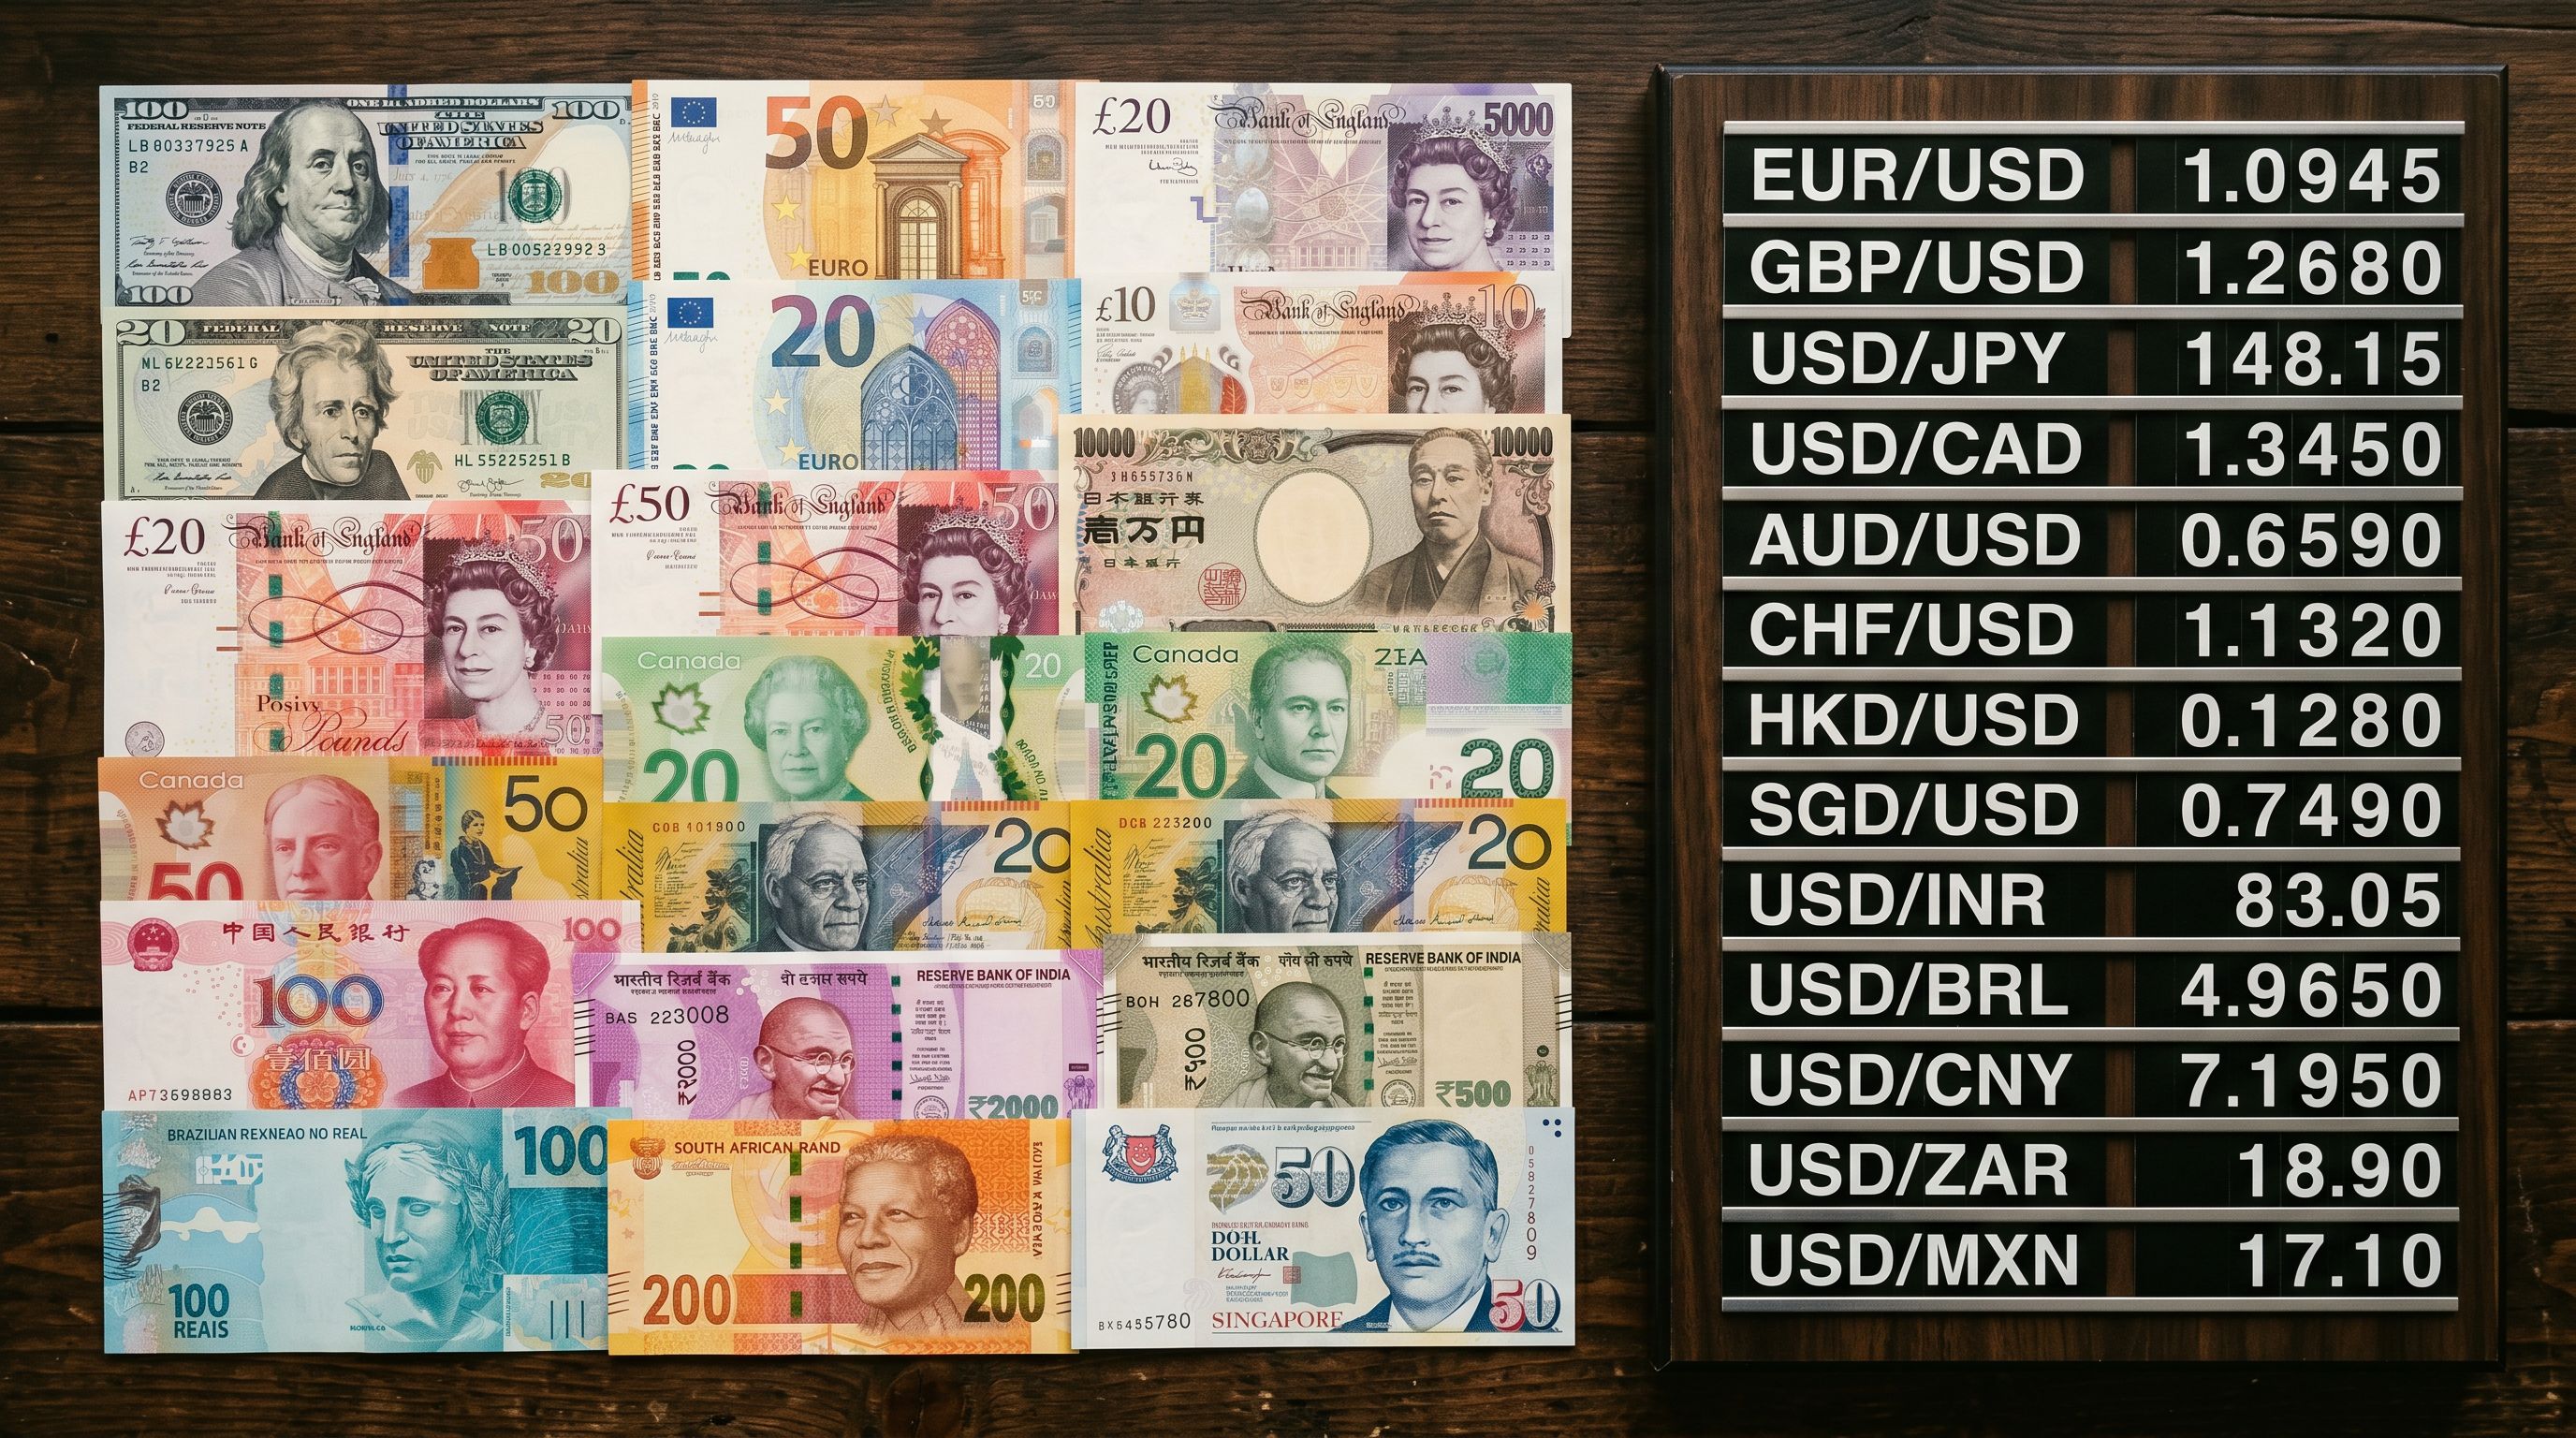
If your supplier provides a single cost price in USD and you sell in multiple markets: use Importier's calculated field to convert to your store's base currency using the current exchange rate, then apply your markup. The result lands in Shopify as the base price, and Shopify Markets handles regional display.
If you need different base prices per market (not just currency conversion): Shopify handles this through price overrides in the Markets settings, not through the import. The import sets the base price; market-specific overrides are configured once in Shopify's Markets panel and apply automatically to all products in that market.
The practical limit: Importier maps product-level data from a single source file to Shopify's standard price fields. Market-specific price lists that go beyond currency conversion (custom prices per country that differ from a standard multiplier) are configured in Shopify Markets after import, not through the import itself.
Scenario 3: B2B and Wholesale Price Columns
For merchants selling to both retail customers and wholesale buyers, the import often contains both a retail price and a wholesale price. The problem: Shopify's standard product fields have only one price. B2B pricing in Shopify works through price lists in the B2B features (Plus plan) or through separate products/variants tagged for wholesale.
The mapping approach depends on your B2B setup:
Shopify B2B price lists (Plus plan): the product is imported with the retail price as the standard Shopify price. The wholesale price is stored separately and mapped to a B2B price list, which overrides the retail price for company accounts. Importier maps the wholesale price column to a custom metafield during import, and a Shopify Flow automation or manual configuration applies it to the price list.
Variant-based wholesale pricing: a common approach for merchants not on Plus is to use separate variants for wholesale (e.g., "Wholesale 12-pack" as a variant option), each with its own price column. The import maps the wholesale price column to the specific variant. This approach does not require Plus but requires careful variant structure setup before importing.
Wholesale via tags and app-based pricing: some merchants use third-party pricing apps that apply discounts to tagged products. The import tags products with a wholesale tag, and the pricing app applies the discount at checkout. No separate price column is needed in the import.
The Shopify B2B product import guide covers how to structure a B2B import for Shopify's native B2B features, including the additional columns (MOQ, case pack, lead time) that are relevant for wholesale catalogues.

- Open supplier CSV in spreadsheet, add formula column for markup
- Recalculate manually every time supplier updates prices
- Risk of formula errors when column positions change between supplier file versions
- No automatic compare-at logic: must set individually or add another formula column
- B2B pricing requires a separate spreadsheet pass before import
- Markup formula configured once in the mapping profile, applied automatically on every import
- Supplier file is never modified: the calculation runs in the mapping layer
- Column position changes handled by remapping, not by editing formulas
- Compare-at price generated from a second multiplier in the same mapping configuration
- B2B price column mapped to a metafield or variant in the same import pass
The Import History Audit Trail for Pricing
Using Import History to Audit Price Changes
When a pricing error appears in your catalogue (wrong margin on a product category, incorrect compare-at prices across a supplier batch), the first question is always: which import introduced this and when?
Importier's Import History answers that directly. Every import is logged with a timestamp, file name, and product count. The 60-day CSV download for each log entry contains the product data as it was in the source file at import time, including the raw supplier cost column before the markup calculation ran.
For a pricing audit:
- Open Import History and identify the import that ran closest to when the pricing issue first appeared.
- Download the CSV for that import.
- Check the cost column in the source file against the markup formula in the mapping profile. If the cost in the CSV is correct but the retail price in Shopify is wrong, the mapping formula has an error. If the cost in the CSV is wrong, the error came from the supplier.
This distinction matters because the remediation is different. A supplier error requires a corrected file and a new import. A mapping error requires fixing the profile before the next import and using Import Undo to revert the affected batch.
The Shopify import column mapping guide covers how to configure and test mapping profiles before running large import sessions, including how to validate calculated fields on a small sample before committing a full catalogue batch.

- 01Configure the price mapping in your import profilemap your supplier's cost column to Shopify's Cost per item field. Then add a calculated field for the retail price: set the formula to cost multiplied by your target markup (e.g., 2.4 for a 140% markup). If you have a compare-at price, add a second calculated field at a higher multiplier.
- 02Test on a 5-10 product sample before running the full batch. Check that the retail prices and compare-at values in Shopify match your expected output. Verify the compare-at price is correctly set so the sale badge appears on the right products.
- 03For B2B pricing, decide your approach before the importShopify B2B price lists (Plus), variant-based wholesale pricing, or app-based tag discounting. Map the wholesale price column to a metafield or variant price column depending on which approach you are using.
- 04Run the full import batch. Check Import History immediately after to confirm the import logged correctly with the expected product count and timestamp. Download the CSV and verify a sample of cost values against the calculated retail prices to confirm the formula ran correctly.
- 05Save the mapping profile with a clear name referencing the supplier and pricing logic (e.g., 'Supplier A2.4x markup, compare-at 3.0x'). The next import from this supplier reuses the same profile with no reconfiguration.
Handling Multi-Supplier Stores
Stores sourcing from multiple suppliers often have different pricing logic per supplier: one supplier provides cost prices with a standard markup, another provides recommended retail prices directly, and a third provides cost prices in a different currency.
Importier handles this with separate mapping profiles per supplier. Each profile encodes the correct pricing logic for that supplier's file format and pricing structure. When the supplier file arrives, you select the matching profile and the correct markup formula applies automatically.
This avoids the most common pricing error in multi-supplier import workflows: applying one supplier's markup formula to another supplier's file. With a named profile per supplier, the formula selection is explicit rather than relying on memory.
The Shopify CSV import guide covers how to set up import profiles for different supplier file formats, including how column mapping handles files where column positions or names vary between suppliers.

Shopify's price list documentation covers how Shopify B2B price lists work in detail, including how to apply price list overrides to specific company accounts. Shopify's Markets pricing documentation covers how base prices interact with market-specific price overrides and when automatic currency conversion applies versus manual price setting.
Try Importier free at importier.app
Set up your first import in under five minutes.
Importier brings products into Shopify with AI descriptions, category metafields, and data enrichment on every run.