Shopify Foreign Currency Import: Convert Before Tax
On this page
Shopify Foreign Currency Import: How to Convert Supplier Prices Before Tax
If you source products from overseas suppliers, shopify import foreign currency conversion seems straightforward: multiply each price by the exchange rate and you are done. In practice, the step most merchants get wrong is not the multiplication. It is where in the process the conversion happens.
This article covers how Importier handles currency conversion at import time, why the step lives inside the Tax section of the wizard rather than before or after it, and why the order of operations produces different results depending on when you convert.
Why manual shopify foreign currency conversion breaks down
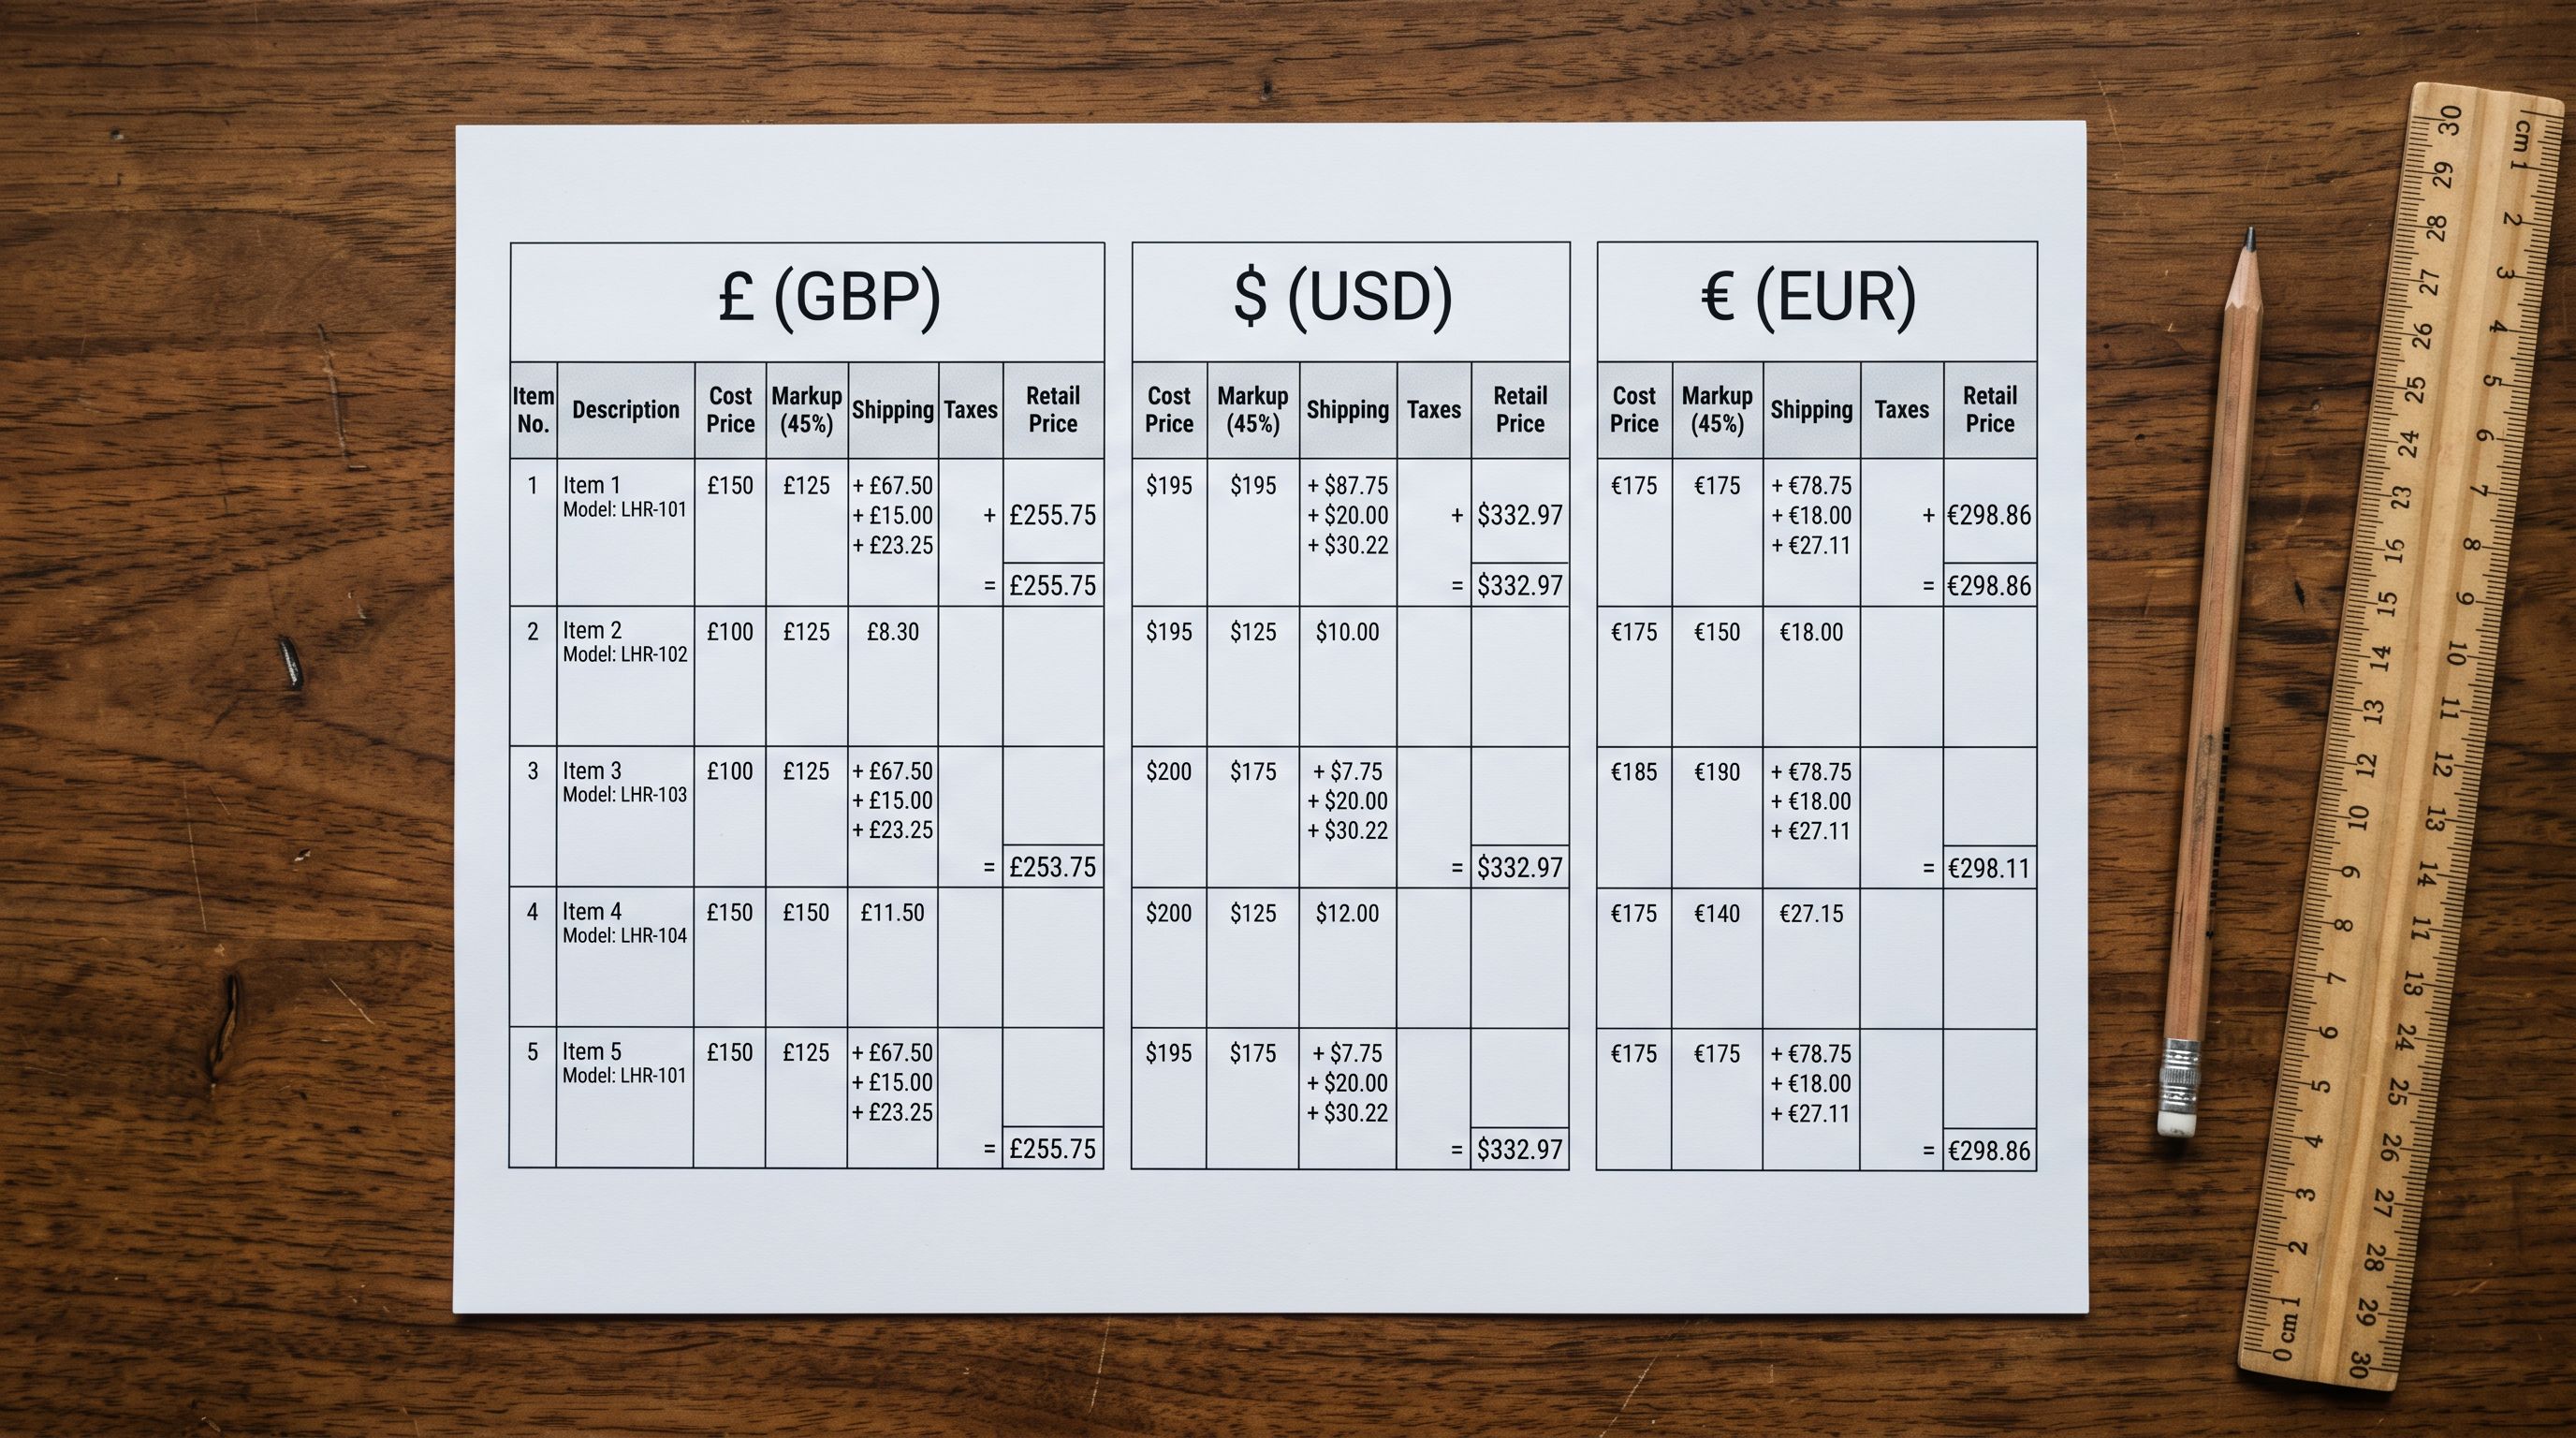
The typical manual workflow for a foreign-currency supplier import runs like this. Your supplier sends a 300-line CSV in US dollars. Your store runs in Australian dollars. You open a spreadsheet alongside the import file, pull the current exchange rate, multiply each price row by the rate, and enter the results into the Cost, Price and Compare-At columns. Then you calculate tax on the converted amounts.
That sequence breaks down in three ways.
Rates drift mid-session. A 300-product import that takes two hours to process has been converted at slightly different effective rates as the market moves between when you started and when you finished. Cost-of-goods figures are inconsistent within the same batch, which makes margin comparisons between products unreliable even when they arrived in the same supplier file.
Rounding accumulates. Multiplying a float by a rate and rounding to two decimal places per row introduces small discrepancies that compound across hundreds of products. They are invisible until someone reconciles the accounts against landed cost at end of quarter.
The third problem is sequence, and it is the one that causes the most trouble.
If you import a product at USD 25 into an AUD store and calculate GST on USD 25 rather than the AUD equivalent, every product's tax figure is wrong. The prices look reasonable. The tax amounts look reasonable.
The error only surfaces later, during a reconciliation that reveals the taxable base used the unconverted figure. At that point, correcting it means going back through every product in every affected import batch.
Any merchant sourcing overseas and selling into a market with consumption tax (Australian GST at 10%, UK VAT at 20%, EU VAT at standard rates, New Zealand GST at 15%) will encounter this if conversion happens after tax rather than before it. The sequence matters, and most documentation about Shopify product imports does not address it directly.
How shopify import foreign currency conversion works in Importier
In Importier's 14-step import wizard, currency conversion is part of the Tax step, not a pre-processing step before the wizard runs and not a post-processing step added after tax has been calculated. The placement is deliberate.
When you reach the Tax step, the Currency Conversion section is available. You choose the source currency, which is the currency your supplier's invoice is denominated in. Importier reads your store's base currency automatically from your Shopify settings, so the target currency is already correct without any additional configuration on your end.
From there you have two options: fetch a current published exchange rate, or enter your own.
The fetch option gives you an accurate, repeatable basis for the batch. The override option exists because wholesale supplier relationships often involve agreed fixed rates. If your supplier has quoted a contracted rate for the quarter, say 1.48 AUD per USD while the market rate sits at 1.51, you enter 1.48. Your landed cost calculations need to reflect what you have contractually agreed to pay, not what the spot market is doing on the day of the import.
Once you apply the rate, Importier converts the cost, price and compare-at price for every product in the import using that single figure. The entire batch moves to your store currency simultaneously, using one consistent rate.
The Tax step then runs on those converted figures. This is the correct sequence for any consumption tax calculation.
- 01Open the Currency Conversion sectionselect the source currency from the dropdown in the Tax step
- 02Fetch or enter a rateaccept the current published exchange rate or type your contracted supplier rate
- 03Apply to the batchcost, price and compare-at convert for every product at once
- 04Tax calculation runsthe Tax step applies your settings to the converted store-currency figures
- 05Review and confirminspect the full converted batch in the Review step before the import reaches Shopify
If you are importing from a domestic supplier, you leave the source currency matching your store currency and the conversion section is skipped entirely. The feature is available on every import without adding steps for merchants who do not need it.

Why a single batch rate matters for margin reporting
The consistency argument for a batch rate extends beyond avoiding errors.
When every product in an import has been converted at exactly the same rate, the cost-of-goods figures are directly comparable across the batch. You can sort by gross margin in a reporting tool and know the numbers are internally coherent. When rates have drifted across rows because you converted at different times, from different sources, or across different sessions for the same batch, those comparisons reflect exchange rate noise as much as actual margin differences.
A single batch rate keeps every product's margin figure comparable. Rates that drift across rows make post-import reporting unreliable, and the error is invisible until you try to reconcile at period end.
The fixed-rate override reinforces this. A wholesale merchant sourcing from a European distributor under a semi-annual pricing agreement will have a contractual EUR/AUD rate that may differ by two or three cents from the spot rate on any given import day. Using the agreed rate rather than the fetched rate keeps the import's cost basis consistent with the accounting for that supplier relationship.
For Shopify merchants using cost-of-goods tracking for profitability analysis, the rate used at import time becomes part of the permanent product record. Getting it right once at import is substantially less work than correcting it afterwards across hundreds of products.
The manual approach versus one batch step
- Pull rate manually and multiply each row in a spreadsheet
- Rates may drift across rows for large batches
- Risk of calculating tax on unconverted foreign-currency price
- Re-enter converted prices into the import file
- Rounding inconsistencies accumulate across hundreds of rows
- One rate applied across all rows simultaneously
- Consistent rate locked for the entire batch
- Tax calculated on converted store-currency prices in correct sequence
- Converted prices visible and editable in Review before any product reaches Shopify
- Override available for contracted supplier rates
A 500-line supplier invoice in another currency is 500 individual conversions by hand, followed by a verification pass to confirm tax was applied to the converted figures. One rate applied across the batch removes both steps. The time saving is not dramatic per product. It is the elimination of the whole process.
Tax and Compliance
Shopify multi-currency: store-facing versus import-time
It is worth separating two currency problems that Shopify merchants regularly conflate.
The first is customer-facing multi-currency: showing prices in different currencies to customers depending on their location. Shopify Markets handles this. Your store holds base prices in your store currency, and Shopify converts them for customer display at checkout.
The customer in Germany sees EUR; the customer in the UK sees GBP. Your base product records stay in AUD.
The second is import-time conversion: your supplier sends cost and retail price data in their currency, and you need those figures converted before they enter your Shopify product database.
These are separate problems solved at different stages by different tools. Shopify Markets handles what customers see at checkout. Import-time conversion handles what goes into your product records in the first place.
Getting import-time prices right in your base currency means Shopify Markets then has an accurate base to work from for customer-facing display and any localised pricing rules you configure.
Merchants who set up Shopify Markets for multi-currency display but import products at unconverted foreign-currency prices find their base price data incorrect from the start. The two steps must both be correct, and they must be addressed separately.
Shopify's tax documentation explains how the platform applies tax rates to product prices at checkout. The tax calculation runs on whatever price is in your Shopify product record at the time of a sale. If the base price in that record reflects an unconverted foreign-currency amount, the tax calculation inherits the error.
International tax obligations and why conversion order matters
If you sell internationally, your consumption tax obligations depend on where your customers are located. EU VAT (including the IOSS scheme for shipments under EUR 150), UK VAT, Australian GST, and Norway's VOEC scheme all calculate tax on the transaction price in the applicable currency.
The practical implication for a Shopify merchant sourcing overseas is that the taxable base for any consumption tax must be the store-currency price. If your supplier invoices in USD and your store runs in AUD, the AUD price is what your tax obligations are calculated against for Australian customers. If you are registered for UK VAT and selling to UK customers, the GBP price is the relevant base.
Import-time conversion handles the product database side of this. Your broader registration obligations, how to store IOSS and VAT registration numbers, and how compliance language surfaces in product descriptions are covered in the Importier international tax compliance guide.
For Importier's Import History: each import batch is logged with date, time, file name and product count. If you use a fixed supplier rate for a batch, noting that rate against the Import History entry gives you a clean audit trail for the exchange rate used if a tax reconciliation later requires it.
How this fits into the import workflow series
This is the third article in a five-part series on handling supplier catalogue imports with multiple data challenges in a single session.
The first covered importing product images from a Dropbox folder: one shared folder link per product row, images imported in natural numeric order rather than alphabetical sort, so the gallery sequence matches the photographer's intent.
The second covered bulk editing product titles before import: the four tool groups that turn inconsistent supplier titles into clean, structured data in seconds, and why title cleanup must happen before AI descriptions are generated: the title is the primary input the AI reads, so the quality of the output depends on the quality of the input.
Currency conversion is the third step. A supplier sends a spreadsheet with images in a Dropbox folder and prices in their local currency. Each step in the workflow handles one problem in its appropriate place: images at the import step, titles in the Generate step, currency in the Tax step.
The fourth article in the series covers filling product specifications automatically from the product title: mapping custom metafields and using AI to propose values based on what the title actually contains, leaving fields blank where the AI is not confident rather than guessing. The fifth article ties all four steps into a single end-to-end workflow.

Key takeaways
- Currency conversion in Importier happens before the tax calculation runs, so tax is applied to the converted store-currency price rather than the foreign-currency figure
- One rate is applied across the entire import batch simultaneously, keeping cost-of-goods figures internally consistent for margin reporting
- You can override the fetched rate with a fixed supplier rate when your supplier relationship involves an agreed contracted rate
- Customer-facing multi-currency through Shopify Markets and import-time conversion are separate problems requiring separate solutions
- Import History records each batch with date and time, giving you a cross-reference point for exchange rate documentation during tax reconciliation periods
Set up your first import in under five minutes.
Importier brings products into Shopify with AI descriptions, category metafields, and data enrichment on every run.